


Photo by Lucian Alexe on Unsplash
Multi-Targeting in .NET MAUI - Part 2
Advanced scenarios with Unit Tests and Dependency Injection


Intro
Welcome to Part 2 of my mini-series about Multi-Targeting in .NET MAUI!
In Part 1, I have explored and demonstrated the built-in functionality of the default .NET MAUI single-project approach providing platform-specific implementations inside the different platform folders. For simple uses cases this approach is completely appropriate and for many scenarios it is absolutely sufficient. However, as soon as unit tests and more complex scenarios come into play, such as database access or user authentication, we might need to take a different approach.
Attention: I have upgraded the sample project from .NET 6.0 to .NET 7.0 which has been released a few days ago. Gerald Versluis has a short blog article about how to do exactly that.
In Part 2, I am now going to show what happens to our previous implementation when we add a Unit Test project to our solution and how to solve the arising issues. We will use filename-based Multi-Targeting for this. I am not going to take a deep dive into Unit Tests here, because that is an entire topic on its own.
Note: I will write a blog post about Unit Tests in the future. Until then, you may want to check out the video by Gerald about how to add a Unit Test project for your MAUI app.
Unit Tests require a different Target Platform
Looking back at Part 1, the following platforms were targeted by our single-project:
- Android
- iOS
- MacCatalyst
- Windows
However, as soon as a Unit Test project is added and a project reference is set to our single project, we will see the following issue (I personally prefer NUnit, but the approach is identical for xUNit, I have tried this with both testing frameworks):
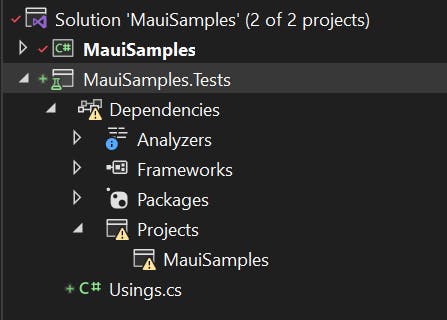
😱 The project reference is invalid!
We can also find the following error message in the Error List:
Project MauiSamples is not compatible with net7.0 (.NETCoreApp,Version=v7.0). Project MauiSamples supports:
  - net7.0-android33.0 (.NETCoreApp,Version=v7.0)
  - net7.0-ios16.0 (.NETCoreApp,Version=v7.0)
  - net7.0-maccatalyst15.4 (.NETCoreApp,Version=v7.0)
  - net7.0-windows10.0.19041 (.NETCoreApp,Version=v7.0)    MauiSamples.Tests
This message tells us the following: None of the targets is supported by the MauiSamples.Tests project that was added.
The reason for this is that Unit Test projects should be platform agnostic and NUnit (as well as xUnit) projects target plain .NET, but none of the platform-specific flavors:
<Project Sdk="Microsoft.NET.Sdk">

  <PropertyGroup>
    <!-- the test project can only reference plain .NET (net7.0 in this case) -->
    <TargetFramework>net7.0</TargetFramework>
    <ImplicitUsings>enable</ImplicitUsings>
    <Nullable>enable</Nullable>
    <IsPackable>false</IsPackable>
  </PropertyGroup>

  <ItemGroup>
    <PackageReference Include="Microsoft.Maui.Dependencies" Version="6.0.547" />
    <PackageReference Include="Microsoft.NET.Test.Sdk" Version="17.3.2" />
    <PackageReference Include="Moq" Version="4.18.2" />
    <PackageReference Include="NUnit" Version="3.13.3" />
    <PackageReference Include="NUnit3TestAdapter" Version="4.2.1" />
    <PackageReference Include="NUnit.Analyzers" Version="3.3.0" />
    <PackageReference Include="coverlet.collector" Version="3.1.2" />
  </ItemGroup>

  <ItemGroup>
    <ProjectReference Include="..\MauiSamples\MauiSamples.csproj" />
  </ItemGroup>

</Project>
Essentially, we are missing the net7.0 platform target in the configuration of our MAUI project. This can easily be resolved by adding net7.0 as another target platform to our MAUI single-project (MauiSamples.csproj in the example). We also need to add an extra condition to the OutputType, because our Unit Test project expects a Dynamic Link Library (.dll) and not an Executable (.exe):
<Project Sdk="Microsoft.NET.Sdk">

  <PropertyGroup>
    <!-- add net7.0 target framework here -->
    <TargetFrameworks>net7.0;net7.0-android;net7.0-ios;net7.0-maccatalyst</TargetFrameworks>
    <TargetFrameworks Condition="$([MSBuild]::IsOSPlatform('windows'))">$(TargetFrameworks);net7.0-windows10.0.19041.0</TargetFrameworks>

    <!-- add this condition as well -->
    <OutputType Condition="'$(TargetFramework)' != 'net7.0'">Exe</OutputType>

    <!-- skipping other settings -->
</Project>
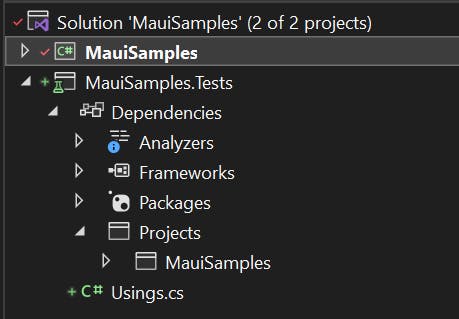
After making these changes our project reference finally is valid 🥳:
Limitations of the built-in approach
But wait, something else seems to be wrong: Our build still fails with a new error 😱:
Error CS1061 'MainPage' does not contain a definition for 'SayHello' and no accessible extension method 'SayHello' accepting a first argument of type 'MainPage' could be found (are you missing a using directive or an assembly reference?) MauiSamples (net7.0)
That's because we did not provide an implementation of the SayHello() extension method for our new net7.0 target platform. We've hit a limitation of the single-project's built-in approach for Multi-Targeting, because there is no directory for non-platform-specific implementations.
In order to remedy this, we can go back to using a preprocessor directive after all:
    private async void Button_OnPressed(object sender, EventArgs e)
    {
#if ANDROID || IOS || MACCATALYST || WINDOWS
        await this.SayHello();
#endif
    }
😓 Bummer! That's what we tried to get rid of in the first place (despite it now being shorter than before). At least, we can write unit tests for our business logic now and still end up with a cleaner setup than what we initially started with in Part 1. A trade-off? Not in the least. Just keep reading.
Solution
Back to square one (regarding the avoidance of preprocessor directives)? Not at all. It's merely a limitation of the .NET MAUI single-project setup. The solution for this is filename (and/or folder) based Multi-Targeting.
The official documentation for this is very useful and I recommend studying it if you want to get a better understanding of what the conditions in the following paragraphs mean. However, I am going to make some alterations to the solution proposed in the official documentation, because we don't want to be limited to a specific major version of .NET.
Instead of continuing with the SayHello() example, I will get into actual platform-specific APIs now and how they can be called from within a ViewModel. That way, we can compare the different approaches within the same solution in the sample repository.
Filename-based Multi-Targeting
When dealing with different platforms, especially when writing services or using platform-specific APIs that share a common interface, it makes sense to group the different implementations together. The default Multi-Targeting approach does not give us this option, while the filename-based approach does. Let's have a look at how this works.
First, we need to update our project file and add the following <ItemGroup> elements:
<!-- Android -->
<ItemGroup Condition="$(TargetFramework.StartsWith('net')) == true AND $(TargetFramework.Contains('-android')) != true">
  <Compile Remove="**\**\*.Android.cs" />
  <None Include="**\**\*.Android.cs" Exclude="$(DefaultItemExcludes);$(DefaultExcludesInProjectFolder)" />
</ItemGroup>

<!-- iOS -->
<ItemGroup Condition="$(TargetFramework.StartsWith('net')) == true AND $(TargetFramework.Contains('-ios')) != true">
  <Compile Remove="**\**\*.iOS.cs" />
  <None Include="**\**\*.iOS.cs" Exclude="$(DefaultItemExcludes);$(DefaultExcludesInProjectFolder)" />
</ItemGroup>

<!-- Mac Catalyst -->
<ItemGroup Condition="$(TargetFramework.StartsWith('net')) == true AND $(TargetFramework.Contains('-maccatalyst')) != true">
  <Compile Remove="**\**\*.MacCatalyst.cs" />
  <None Include="**\**\*.MacCatalyst.cs" Exclude="$(DefaultItemExcludes);$(DefaultExcludesInProjectFolder)" />
</ItemGroup>

<!-- Windows -->
<ItemGroup Condition="$(TargetFramework.StartsWith('net')) == true AND $(TargetFramework.Contains('-windows')) != true">
  <Compile Remove="**\*.Windows.cs" />
  <None Include="**\*.Windows.cs" Exclude="$(DefaultItemExcludes);$(DefaultExcludesInProjectFolder)" />
</ItemGroup>

<!-- .NET -->
<ItemGroup Condition="!($(TargetFramework.StartsWith('net')) == true AND $(TargetFramework.EndsWith('.0')) == true AND $(TargetFramework.Contains('-')) != true)">
  <!-- e.g net6.0 or net7.0 -->
  <Compile Remove="**\*.net.cs" />
  <None Include="**\*.net.cs" Exclude="$(DefaultItemExcludes);$(DefaultExcludesInProjectFolder)" />
</ItemGroup>
With these <ItemGroup> elements we are telling the build system to only compile certain files when a specific platform is selected and otherwise simply ignore them based on their filename. For example, we only want the Android-specific C# files with the Android.cs suffix to be compiled when the target platform is net6.0-android or net7.0-android (or higher). In all other cases, the files are removed from compilation.
Note: Often, you will come across similar setups where the .NET version is hard-coded in the conditions of the
<ItemGroup>elements, like in the official documentation. That's fine if you don't plan to upgrade to newer .NET versions, but I just switched fromnet6.0tonet7.0and this way, I had less to adjust in my project file.
Essentially, instead of using conditional compilation with preprocessor directives, we are now using filename-based conditional compilation.
A common interface
Having the filename-based conditional compilation in place, we can now create a new folder in our project and add platform-specific implementations to call some platform-specific APIs. Let's call the folder Services\Device. In this folder, we can then add an interface that I call IDeviceService and which declares a single method to set the screen brightness:
namespace MauiSamples.Services.Device;

public interface IDeviceService
{
    void SetScreenBrightness(float brightness);
}
This can be used for Dependency Injection and Unit Tests, which we will have a look at a little further down, but let's first create the platform-specific implementations.
Since we are dealing with a platform-agnostic scenario, meaning that our business logic does not know anything about the platform it is being executed on, we need to provide implementations for all the possible platforms that are part of our single project, even the ones that are unused. We will do this in a sub-folder called Platform and with the following names:
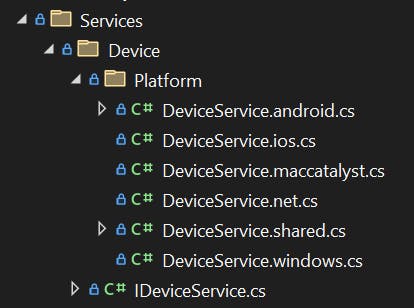
Note that we have C# files for each of our five target platforms (including plain .NET) and also a DeviceService.shared.cs file.
A shared implementation
First, we implement our shared class. We are going to use partial classes for this setup and DeviceService.shared.cs will serve as the shared part of our implementation, because we may have common methods and properties that may be shared among the different platform implementations.
Note: Technically, it would also be possible to do this without the shared part and without
partialclasses.
namespace MauiSamples.Services.Device.Platform;

public partial class DeviceService : IDeviceService
{
    private static DeviceService _instance;
    public static DeviceService Instance => _instance ??= new DeviceService();

    private DeviceService() {}

    public partial void SetScreenBrightness(float brightness);
}
Note how this shared part does not provide a body for the SetScreenBrightness() method. The reason for this is that each platform should provide its own implementation. Therefore, the body will be defined in the platform-specific code files.
For simplicity and ease of access to other APIs that are not covered in this article, I have also created a singleton for our DeviceServices class.
Note: Singletons are commonly considered to be an anti-pattern, because they may violate the Single Responsibility Principle and are often misused for so-called God-objects (global classes that contain a lot of shared logic and information). However, you will come across singletons in cross-platform and API development quite often. When used appropriately, they deserve some love, too.
The platform-specific implementations
Now that we have the interface and the shared code, we can finally create the platform-specific implementations. To keep things short, I will only focus on Android and iOS here, using the screen brightness example.
Important: Just like in the built-in Multi-Targeting approach from Part 1, it is important that the namespace and class name are exactly the same for each implementation.
.NET, Windows and MacCatalyst
Our plain .NET, Windows and MacCatalyst implementations will only be empty stubs:
namespace MauiSamples.Services.Device.Platform;

partial class DeviceService
{
    public partial void SetScreenBrightness(float brightness)
    {
        //ignore
    }
}
Only mobile platforms like Android and iOS support setting the screen brightness directly (as far as I know).
Android
using AndroidPlatform = Microsoft.Maui.ApplicationModel.Platform;

namespace MauiSamples.Services.Device.Platform;

partial class DeviceService
{
    public partial void SetScreenBrightness(float brightness)
    {
        if (AndroidPlatform.CurrentActivity?.Window?.Attributes == null)
        {
            return;
        }

        var attributes = AndroidPlatform.CurrentActivity.Window.Attributes;
        attributes.ScreenBrightness = brightness;
        AndroidPlatform.CurrentActivity.Window.Attributes = attributes;
    }
}
iOS
using UIKit;

namespace MauiSamples.Services.Device.Platform;

partial class DeviceService
{
    public partial void SetScreenBrightness(float brightness)
    {
        UIScreen.MainScreen.Brightness = brightness;
    }
}
And just like that, we have our platform-specific API calls hidden behind a common interface, accessible either through our singleton or via the interface through Depedency Injection. We can now use the singleton instance of our DeviceService class and call the SetScreenBrightness() method from anywhere in our business logic without knowing the current target platform. We can even apply DIP and inject the DeviceService as a dependency using the IDeviceService interface.
The really cool thing is that we can use platform-specific namespaces inside these implementations without any build errors on the other target platforms, because we use filename-based conditional compilation under the hood.
Putting it all to use
To keep things short, I am using MVVM Code Generation for the ViewModel and I will only show a single Unit Test for demonstration purposes.
James Montemagno has a great video about the MVVM Source Generators. I will also dig deeper into Code Generation for MVVM in a separate blog post.
The View and its ViewModel
Let's start with the ViewModel. I will call this class MainViewModel, because it will be the ViewModel for my MainPage and it only contains a constructor, two methods to set the screen brightness and also a private field for our IDeviceService interface from above. The dependency on the specific DeviceService implementation can be injected via the constructor that way.
using CommunityToolkit.Mvvm.ComponentModel;
using CommunityToolkit.Mvvm.Input;
using MauiSamples.Services.Device;

namespace MauiSamples.ViewModels;

[ObservableObject]
public partial class MainViewModel
{
    private readonly IDeviceService _deviceService;

    public MainViewModel(IDeviceService deviceService)
    {
        _deviceService = deviceService;
    }

    [RelayCommand]
    public void SetHighBrightness()
    {
        _deviceService.SetScreenBrightness(1.0f);
    }

    [RelayCommand]
    public void SetLowBrightness()
    {
        _deviceService.SetScreenBrightness(0.1f);
    }
}
That's it already for the ViewModel. It can now be used as the BindingContext for the MainPage.xaml.cs:
public MainPage()
{
    InitializeComponent();
    BindingContext = new MainViewModel(DeviceService.Instance);
}
Note how the singleton is used to inject the dependency with the platform-specific implementation (decided at compile-time, remember?) into the ViewModel, which does not know anything at all about the different platforms.
In the MainPage.xaml we can now add two buttons and bind to the commands (which are auto-generated for us):
<HorizontalStackLayout
  Spacing="30"
  HorizontalOptions="Center">
  <Button
    Text="Dim Display"
    HorizontalOptions="Start"
    WidthRequest="100"
    Command="{Binding SetLowBrightnessCommand}"/>
  <Button
    Text="Undim Display"
    HorizontalOptions="End"
    WidthRequest="100"
    Command="{Binding SetHighBrightnessCommand}"/>
</HorizontalStackLayout>
Awesome, now we can dim and undim the display of our mobile device. 🍾
Note: Like with many other platform-specific APIs, this only works on real devices, emulators/simulators do not support dimming. If you would like to see the code in action, check out the GitHub repository for this post and run the app on a real Android or iOS device.
Writing Unit Tests
Perfect, we can not only dim our display now, we can also write Unit Tests for our ViewModel in our test project, because we have an interface that we can use to mock the dependency (I'm using the Moq library here, but any other mocking framework will work just as well):
using MauiSamples.Services.Device;
using MauiSamples.ViewModels;
using Moq;

namespace MauiSamples.Tests.ViewModels;

[TestFixture]
public class MainViewModelTests
{
    [Test]
    public void SetHighBrightness_SetScreenBrightnessCalled()
    {
        //arrange
        var deviceServiceMock = new Mock<IDeviceService>();
        var vm = new MainViewModel(deviceServiceMock.Object);

        //act
        vm.SetHighBrightness();

        //assert
        deviceServiceMock.Verify(service => service.SetScreenBrightness(It.IsAny<float>()), Times.Once);
    }
}
Wonderful. My developer heart is happy and full of joy. 💖
Conclusions and next steps
As I have demonstrated, Multi-Targeting is a marvelous way to support platform-specific APIs from within a single MAUI app project. The need for platform-specific projects we know from Xamarin.Forms is gone, drastically reducing development and maintenance effort while still allowing to implement platform-specific functionality.
With filename-based Multi-Targeting, we can group platform implementations together, use a common interface and share some parts of the code to reduce code duplication. A .NET MAUI project doesn't require a variety of different platform and test projects to be maintained separately.
Even custom components and MAUI class libraries can make use of the Multi-Targeting approaches that I have presented in this mini-series, as you will see in future blog posts.
If you enjoyed this blog post, then follow me on LinkedIn, subscribe to this blog and star the GitHub repository for this post so you don't miss out on any future posts.